Blocking countries with GeoLite2 in nginx using the swag/letsencrypt docker container
Written: 2019-07-01
Tags
Category

Since the GeoLite legacy database has been discontinued, we now have to use the GeoLite2 database to get new updates to the database. This will be a followup article from the post i made about the legacy database. As the new GeoLite2 database uses a new format (maxminddb) we couldn't just switch to the new database. Nginx also needed to be compiled with the geoip2 modul. And with Aptalca's pull request on the alpine repo added it will just be a matter of a minor update to the nginx.conf file!
GeoLite2 database
Update
As of 15.05.20 you can add the variable -e MAXMINDDB_LICENSE_KEY =
As of 12/30/19 you have to sign up to Maxmind to be able to download the database. https://blog.maxmind.com/2019/12/18/significant-changes-to-accessing-and-using-geolite2-databases/
Create an account and go to your account page to download the database.
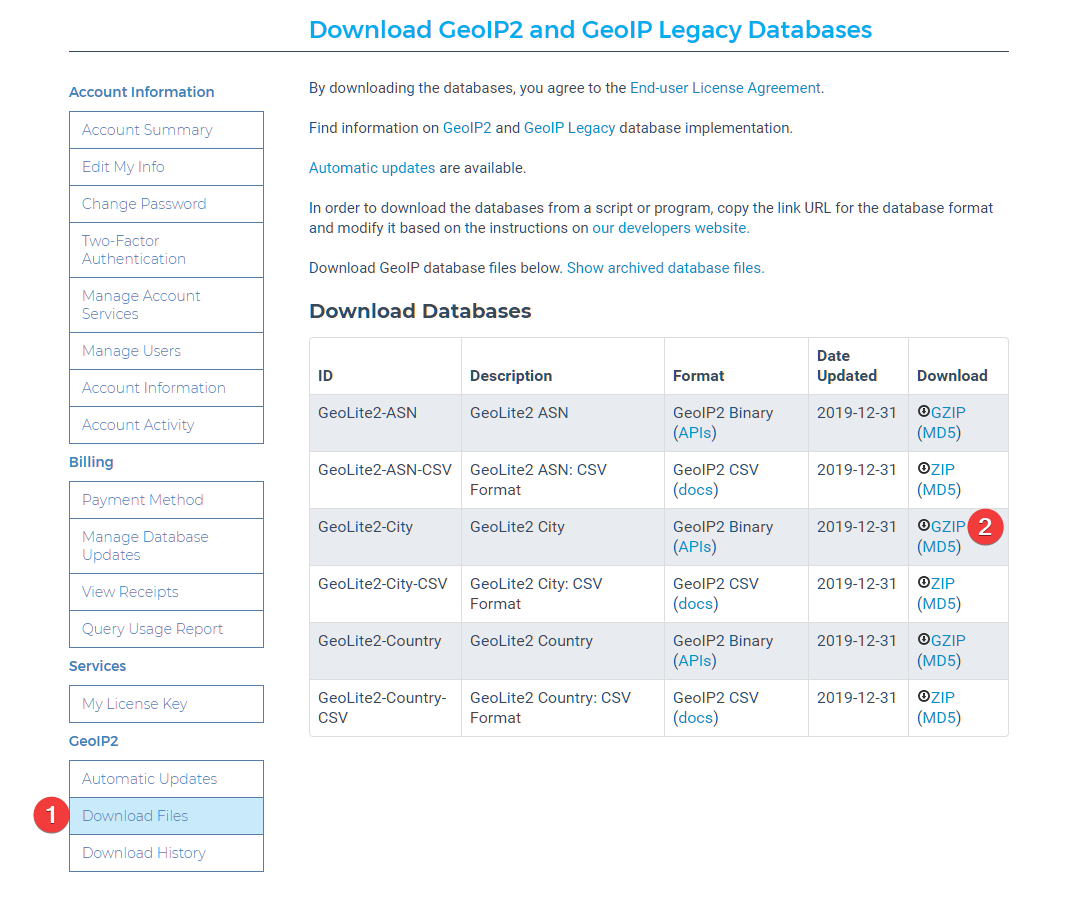
Download the database and extract the .mmdb file to the folder of you choice. I'll be using /config/geoip2db/ for my setup.
NGINX
In the latest version of nginx.conf there is now a line that says #include /config/nginx/geoip2.conf; Uncomment that line. If you dont have that line, you can just add it.
Open the geoip2.conf file and find the line that says map $geoip2_data_country_iso_code $allowed_country { As it says default must be either yes or no. To block everything set it no. Add the country codes you want to allow accessfrom this list. e.g. US yes; This will block all other countries than the one you choose. You can also add more than one country if you want. Like this:
# GEOIP2 COUNTRY CONFIG
map $geoip2_data_country_iso_code $allowed_country {
    default no;
    US yes;
}
Now since we have set default to no, you will need to add the local ip ranges that you want to allow access in the $allow_list variable below. Like this:
# ALLOW LOCAL ACCESS
geo $allow_list {
    default no;
    192.168.1.0/24 yes;
}
Remember to also set default to no in in the $allow_list
Check out https://www.aelius.com/njh/subnet_sheet.html if you are wondering what your CIDRnotation is. Most often it will be /24 (netmask 255.255.255.0) To find your netmask run ipconfig /all on windows or ifconfig | grep netmask on linux.
Note
The ALLOW LOCAL ACCESS part is only needed if you set default to no in the map $geoip2_data_country_iso_codeconfig.
Setting default to no means that it will block any IP addresses from the database not set to yes, even local ones.
For it to actually block you need to add this in your server blocks inside the proxy-confs and site-confs folder:
if ($allow_list = yes) {
set $allowed_country yes;
}
if ($allowed_country = no) {
return 444;
}
Here is an example using the unifi-controller.subdomain.conf in proxy-confs:
server {
    listen 443 ssl;
    listen [::]:443 ssl;

    server_name unifi.*;

    include /config/nginx/ssl.conf;

#COUNTRY GEO BLOCK
    if ($allow_list = yes) {
    set $allowed_country yes;
    }
    if ($allowed_country = no) {
    return 444;
    }

    client_max_body_size 0;

    # enable for ldap auth, fill in ldap details in ldap.conf
    #include /config/nginx/ldap.conf;

    # enable for Authelia
    #include /config/nginx/authelia-server.conf;

    location / {
        # enable the next two lines for http auth
        #auth_basic "Restricted";
        #auth_basic_user_file /config/nginx/.htpasswd;

        # enable the next two lines for ldap auth
        #auth_request /auth;
        #error_page 401 =200 /ldaplogin;

        # enable for Authelia
        #include /config/nginx/authelia-location.conf;

        include /config/nginx/proxy.conf;
        resolver 127.0.0.11 valid=30s;
        set $upstream_app unifi-controller;
        set $upstream_port 8443;
        set $upstream_proto https;
        proxy_pass $upstream_proto://$upstream_app:$upstream_port;

        proxy_buffering off;
    }
}
Multiple geo blocks
If you host several websites and want a different country block just add another with a different variable name. e.g. $allowed_country2:
 # GEO IP BLOCK DOMAIN 2
  map $geoip2_data_country_iso_code $allowed_country2 {
   default yes;
    CN no; #China
    RU no; #Russia
    HK no; #Hong Kong
    IN no; #India
    IR no; #Iran
    VN no; #Vietnam
    TR no; #Turkey
    EG no; #Egypt
    MX no; #Mexico
    JP no; #Japan
    KR no; #South Korea
    KP no; #North Korea :)
    PE no; #Peru
    BR no; #Brazil
    UA no; #Ukraine
    ID no; #Indonesia
    TH no; #Thailand
 }
As default is set to yes it will allow every country except the country codes set to no
And in the server block add this
# COUNTRY GEO BLOCK 2
    if ($allowed_country2 = no) {
    return 444;
    }
I made this list based on the Spamhaus statistics and Aakamai's state of the internet report.
Blocked
You can test if it worked with a VPN or do a performance test from a location that is blocked herehttps://www.webpagetest.org/
TIP! This database gets updated
Update
As of 15.05.20 you can add the variable -e MAXMINDDB_LICENSE_KEY =
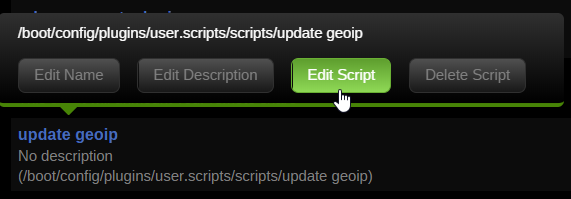
By setting up a cronjob you can easily automate the update process. I use the Unraid User Scripts plugin and set a cronjob to run every day but the GeoLite2 Country and City databases are updated on the first Tuesday of each month, so choose whatever suits your needs. Click on Add New Script → Enter the name → Click on the name of the script and then Edit Script
Warning
Since you need to sign up to Maxmind.com to download you need to create a licence key to be able to directly download the database
Go to the licence keys page and create a license key. Select no when asked if you want to use the key with geoupdate.
Replace XXXXXXXXXX with your license key.
#!/usr/bin/env bash
licensekey="XXXXXXXXXXXXX"
wget -O /tmp/GeoLite2-City.tar.gz "https://download.maxmind.com/app/geoip_download?edition_id=GeoLite2-City&license_key=${licensekey}&suffix=tar.gz"
tar -xvf /tmp/GeoLite2-City.tar.gz -C /tmp/ --wildcards "*.mmdb" --strip 1
mv /tmp/GeoLite2-City.mmdb /mnt/user/appdata/swag/geolite2/
chown 911:911 /mnt/user/appdata/letsencrypt/geolite2/GeoLite2-City.mmdb
Set the schedule to Schedule Daily or whenever you'd like.

Click Run In Background and then Apply
Cloudflare
Update: cloudflare_real-ip - Docker mod for SWAG
Check out the docker mod https://github.com/linuxserver/docker-mods/tree/swag-cloudflare-real-ip This mod adds a startup scipt that gets the IP's from Cloudflares edge servers, and formats them in a format Nginx can use with set_real_ip_from.
If you use Cloudflare you will need to add the following in nginx so that it won't block the Cloudflare IP but the actual IP of the visitor. If you don't do this you will get false positives.
Add the following section to yournginx.conf file found in appdata/swag/nginx/
set_real_ip_from 103.21.244.0/22;
set_real_ip_from 103.22.200.0/22;
set_real_ip_from 103.31.4.0/22;
set_real_ip_from 104.16.0.0/13;
set_real_ip_from 104.24.0.0/14;
set_real_ip_from 108.162.192.0/18;
set_real_ip_from 131.0.72.0/22;
set_real_ip_from 141.101.64.0/18;
set_real_ip_from 162.158.0.0/15;
set_real_ip_from 172.64.0.0/13;
set_real_ip_from 173.245.48.0/20;
set_real_ip_from 188.114.96.0/20;
set_real_ip_from 190.93.240.0/20;
set_real_ip_from 197.234.240.0/22;
set_real_ip_from 198.41.128.0/17;
set_real_ip_from 2400:cb00::/32;
set_real_ip_from 2606:4700::/32;
set_real_ip_from 2803:f800::/32;
set_real_ip_from 2405:b500::/32;
set_real_ip_from 2405:8100::/32;
set_real_ip_from 2c0f:f248::/32;
set_real_ip_from 2a06:98c0::/29;

real_ip_header X-Forwarded-For;
You can set it up as an include like this too:
##
# CF Real IP
##
include /config/nginx/cf_real-ip.conf;
real_ip_header X-Forwarded-For;
After that you need to restart the swag container for the changes to take effect.
Automatically updating the cf_real-ip.conf
Tronyx over at the discord forums graciously shared his script for updating the Cloudflare ip list. This list is not static and Cloudflare updates it once in a while.
The script below will update the list with any changes in the list of IPs from CF
#!/usr/bin/env bash

curl -s 'https://www.cloudflare.com/ips-v4' > /tmp/cf.txt
curl -s 'https://www.cloudflare.com/ips-v6' >> /tmp/cf.txt

sed 's/^/set_real_ip_from /' /tmp/cf.txt > /tmp/cf2.txt

sed -e 's/$/;/' /tmp/cf2.txt > /home/swag/config/nginx/cf_real-ip.conf
I use unraid so I will use the User Scripts plugin to setup a cronjob that will run once a week.
- Go to Settings > User Scripts and click
Add New Script - Give it a name and a description if you want
- Click edit script and add it inside the box.
- You will need to update the path in the last line to you nginx appdata folder
- Set the schedule to weekly and click apply and done.
#!/bin/bash
curl -s 'https://www.cloudflare.com/ips-v4' > /tmp/cf.txt
curl -s 'https://www.cloudflare.com/ips-v6' >> /tmp/cf.txt

sed 's/^/set_real_ip_from /' /tmp/cf.txt > /tmp/cf2.txt

sed -e 's/$/;/' /tmp/cf2.txt > /mnt/user/appdata/swag/nginx/cf_real-ip.conf
If you need any extra help join the Discord server
Souce: https://github.com/leev/ngx_http_geoip2_module https://dev.maxmind.com/geoip/legacy/install/country/ http://dev.maxmind.com/geoip/legacy/codes/iso3166/ https://www.howtoforge.com/nginx-how-to-block-visitors-by-country-with-the-geoip-module-debian-ubuntu https://www.spamhaus.org/statistics/botnet-cc/ https://www.akamai.com/us/en/multimedia/documents/state-of-the-internet/q3-2017-state-of-the-internet-security-report.pdf